Tech4POD - Equivalent Text Description
D4 Prototype
Brief Description:
Three views of a prototype foot orthosis
Essential Description:
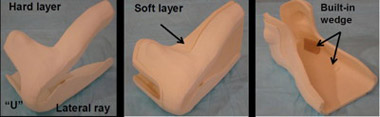
Three pictures illustrate the construction of a foot orthosis. The left shows the hard layer, the middle the soft layer, and the right indicates the location of built-in wedges.
Detailed Description:
The three photographs show the stages to create a foot orthosis. The first image, labeled “Hard layer”, shows the framework for the orthotic. It is a boot shape with a widening base at the toes, and a “Lateral ray” cutout on the bottom of the boot in the shape of a bowling pin. A “U” is cut from the back of the orthotic where the calf meets the ankle. The second image, labeled “Soft layer” shows the same orthotic frame as the first photo with a layer of foam on the inside of the hard frame. The foam covers the cutout on the bottom as one piece, but follows the cutout in the back of the orthotic, only lining the edges of the hard layer. The third image shows the orthotic from a front angle, and shows outcroppings incorporated into the hard layer for bony protrusions. A “Buit-in wedge” is an additional piece of square foam placed under the lateral bony protrusion of the hard layer.